
My first brew kettle wrapped in a heatbelt.
I’ve brewed two recipes now that have used a sour mashing technique. The first was a Berliner Weiss from a recipe provided by Black Star Coop. I ran into their Waterloo at the Austin Homebrew Supply store anniversary party a few years back and was hooked on the easy-drinking, sour beer. The second was a Belgian Double Wit, Licensed Fool
The general technique for souring a mash is well known: keep your mash temp warm for 12 to 24 hours after you’ve completed the normal mash schedule for the beer. This extended time and heat allow the biological bugs that reside on the surface of the grain to consume the sugars and multiply which in turn generate various souring compounds, like lactic acid from Lactobacillus.
I’ve heard many stories about how “sick” homebrewer’s beer became during this time as well as the terrible smell. I can attest to this roadkill aroma as I’ve bagged up still-hot grains from a mash and left it in the trashcan. The stench overwhelmed the garage and a new cleanup technique was born. I now remove the liquid and let the grains cool before tossing them in the can.
As I studied number threads on sour mashing on homebrewtalk.com and other articles I wondered if there was a cleaner way to get the sour flavors without risking the whole beer, or even a sour starter which can still be hit or miss. It turns out that, of course, there is a safer way.
Instead of letting the bugs on the grains infect either a starter or your mash we infect the wort with a specific bug, Lactobacillus, but we need to ensure that this is the dominate bug and nothing else can spoil the wort. A simple post-mash pasteurization is performed by heating the drained wort up to 176F and then chilling back down to 120F before pitching a vial of Lactobacillus from White Labs.
There are a few more details needed to ensure good lactic production. First, Lactobacillus are anaerobic, so removing as much oxygen from the environment promotes their grown and keeps other bad bugs (say Acetobacter) from taking hold. The best method I’ve seen for this is to flush the surface of the wort in your pot with CO2, and then covering with foil, plastic wrap, or a sealed kettle lid.

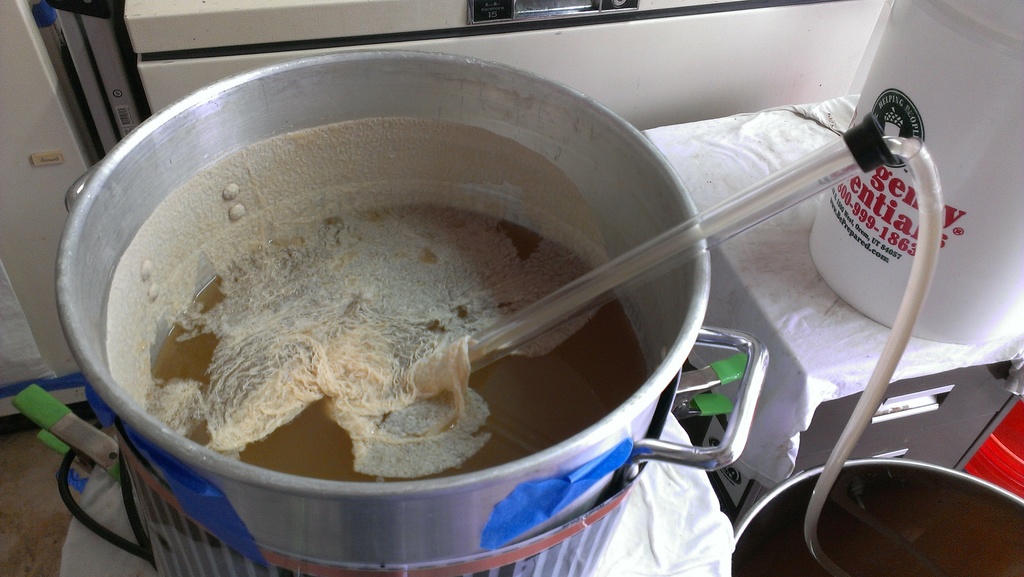
Sour mashed wort after 3 days
The other critical step is keeping the temperature at 120F without going too high or low. Many homebrewers use ice chest or water chests as mash tuns which have lots of insulation. These vessels tend to hold their heat well over time, but not so well over the multiple days needed for lactic production. This can be addressed with hot water infusions but this dilutes your wort.
Instead I chose to use my heatbelt setup typically reserved for fermentation temp control. My first sour mash occurred during the winter months so I wasn’t sure if two heat belts and some blankets would be enough in the cold garage, however that was fully sufficient. I’ve since upgraded the heatbelts (longer) and added an infrared layer so I can keep heat on my 20 Gallon Blichmann pots which will be needed when I do a 10 Gallon batch of Berliner Weiss.
If the sour mash goes well, then you’ll be presented with a nice, tart-smelling and funky wort. A top layer may form on the surface of the beer. The pelicle forms to protect the bacteria. You can remove it or ignore it. I ended up racking around it.
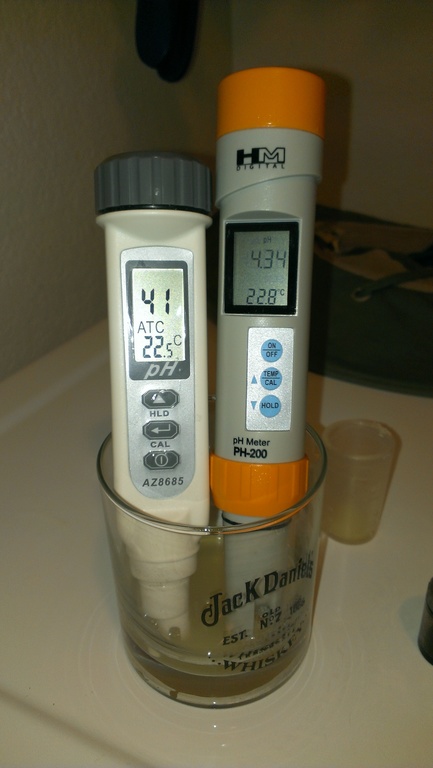
I also like to check the pH of the wort. As the souring level increases the pH will drop. My first Berliner Weiss I let sour for 3 days and ended up at around 4.0. My second sour brew went for the same time and got close, around 4.2.
Equipment List
42 Quart Aluminum Pot with Lid
6′ Heat tape Belt
11″x17″ Infrared Head Pad
Johnson A419 Digital Temp Controller
pH Meter
Auto-siphon for use only with Sour Beers