Needs more sour…

sour-mash-in-blichmann-pot-1024x768

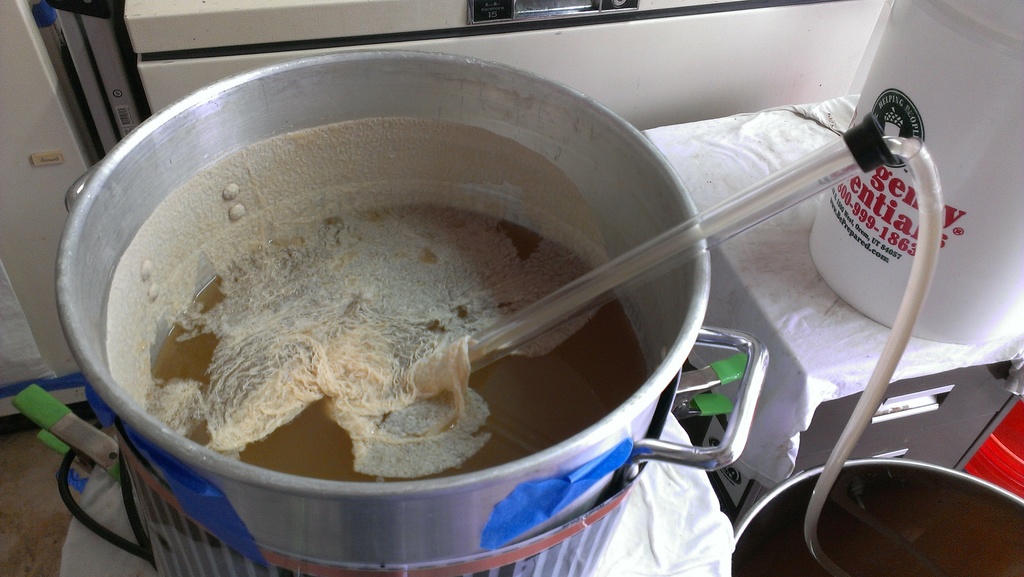
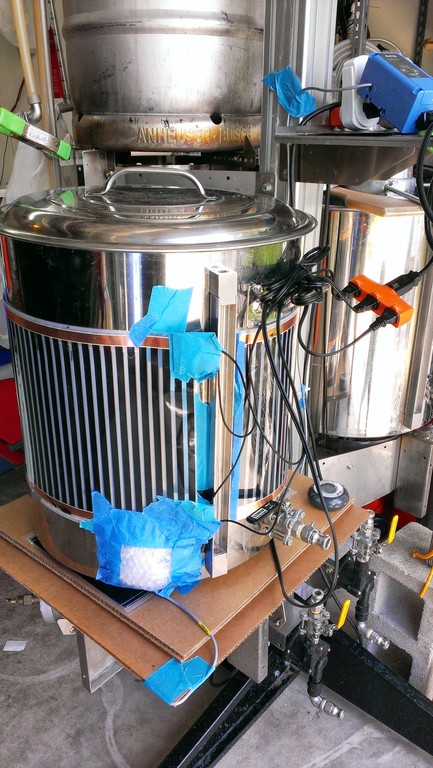
Sour-mashing 12 gallons of work in a Blichmann 20G kettle. Heat-belts and temp controller to keep temp between 115 and 120F.

I brewed my first sour-mashed Berliner Weisse back in January this year on my dreaded double-brew day which involved doing a quick 30 minute boil and chill while trying to mash a Flanders Red. Patience grasshopper. I aged the first Berline Weisse, MomoSuppai on 10 pounds of frozen peaches resulting in a very nice, light, peachy beer. The only real criticism was that it needed more sour to it. The original had about 48 hours of time with a pure Lactobacillus culture at 120F degrees. In my notes, I said next I’d let it sour longer.

That time as come. In addition to the desire for more tartness, I also wanted more volume. The first 5 gallons went way too fast, so the only thing to do was to bump up the volume. The challenge was how to sour mash the larger volume. The sour mash process I follow has the mashed wort held at close to 120F for as many days as you like after pitching a pure culture of Lactobacillus. The pure culture helps ensure that many of the off-flavors that can come from other bacteria don’t make it into the beer versus the traditional method of pitching in uncrushed grain which carries tons of bacteria.

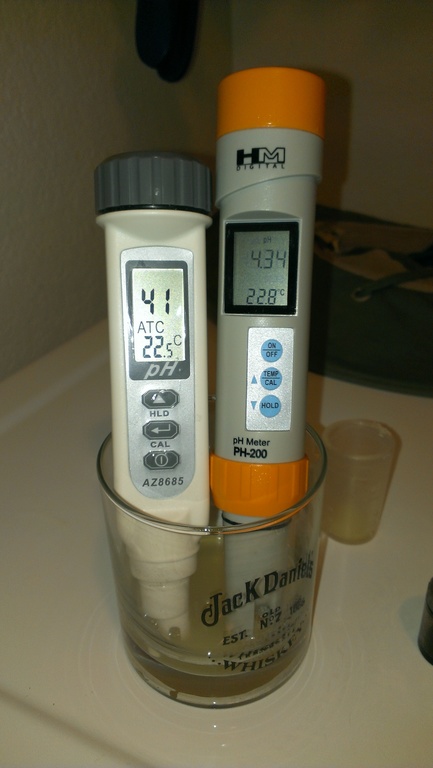
I picked up some additional heat belts which I’ve used before to ensure proper temp control for the sour mash and they worked very well… almost too well as this time around I ended up pushing the temp up to 130F, not on purpose. I ended up toss in two handfuls of some uncrushed grain just in case the higher temp killed of the lab lacto. The result after 5 days was an intensely sour wort, hitting 3.2 pH.

On the offical brewday, the wort was boiled for about 30 minutes with a tiny addition of cascade, chilled to pitching temp and that’s it. The next challenge for this beer was getting fermentation going. I originally pitched one package of S-05 dry yeast. I had seen in many places that dry-yeast packets tend to have significantly more yeast cells than liquid yeast. The yeast pitching rate calculator indicated that I needed just over 250 billion yeast for 12 gallons of 1.031 S.G wort. Surely one packet would be enough. After two days though there was no sign of fermentation.

While I wasn’t panicking, I was worried. Looking around, I saw some more discussion about making sure you pitched heavily in an acidic environment so I promptly pitched another 3 packets of dry-yeast. A day later, I was rewarded with a nice krausen on the surface.

dai-momo-berliner-weisse-fermenting-1024x768

Thin krausen forming after pitching 5 packets of S05 dry-yeast.

After a week of fermentation, the beer is down to 1.010 S.G, so a little more to go. After terminal gravity, I’ll split the batch and age on BlackBerry and Apricot puree to try out some new fruit flavors in the beer.

The recipe is just a scaled-up version of the original.

Recipe Details

Batch Size Boil Time IBU SRM Est. OG Est. FG ABV
10 gal 30 min 4.0 IBUs 2.7 SRM 1.029 1.006 3.0 %
Actuals 1.03 1.01 2.6 %

Style Details

Name Cat. OG Range FG Range IBU SRM Carb ABV
Berliner Weiss 17 A 1.028 - 1.032 1.003 - 1.006 3 - 8 2 - 3 2.4 - 2.9 2.8 - 3.8 %

Fermentables

Name Amount %
Brewer's Malt, 2-Row, Premium (Great Western) 6.667 lbs 57.14
White Wheat Malt 5 lbs 42.86

Hops

Name Amount Time Use Form Alpha %
Cascade 0.57 oz 30 min Boil Pellet 5.9

Miscs

Name Amount Time Use Type
Calcium Chloride 8.10 g 60 min Mash Water Agent
Gypsum (Calcium Sulfate) 8.10 g 60 min Mash Water Agent
Epsom Salt (MgSO4) 0.70 g 60 min Mash Water Agent

Mash

Step Temperature Time
Saccharification 148°F 90 min
Mash Out 168°F 10 min

Notes

DO NOT BOIL

V2:
Pitched 2 vials of WLP Lacto into 12+ gallons of 1.031 wort. Low on C02 so blanket wasn't as good as I'd like. Initial temp was 105F, in 12 hours was at 124F. Heavily wrapped with bottom heater and two layers on the side.

Checked temp again after unwrapping blankets, and temp was up to 125. I opened up the top and stirred, temp rose to 130F as the heat got distributed.

Sanitized two ice bottles and left in for 2 hours to bring temp down to 113F. Plugged all 3 controllers back in and set temp for 117F.

Wednesday morning (48 hours) ph is 3.77 @ 28C. Taste is slightly acidic, very light, not enough punch. New batch of co2 used to blanket it and also added two handfuls of 2-row grain uncrushed hoping to kick up some more bacterial activity.

Friday Morning, ph is 3.28 @ 23C. Taste is decidedly sour. on it's way to being quite potent. Nose is lactic with some buteryc funk... probably from tossing the the 2-row. Hoping to push the tar over the top by 6PM tonight.

Saturday, ph is 3.29 @ 23C. No ferm activity. Pitched second packet of yeast.

Sunday, ph is 3.29 @ 23C. No ferm activity. Gravity shows some movement, 1.035 -> 1.031. Two packages is still under pitched according to new yeast calculators, so picked up 3 more packets (5 * 11.5 grams in total). Pitched the rest, stirred up fermentor to resuspend the yeast.

Monday, very thing, but bubbly krausen on surface of wort.

2013-07-11, Krausen thining out, gravity check: 1.008 @ 71.9F -> 1.010 S.G. Nose is lacto and some heavy funk, like stinky feet. Aroma fades to simple lacto, wheat, sour. Taste is very very nice. A bit think mouth feel, slightly carbed, excellently sour, peachy, wheat. appearence is nearly 2 or 3 SRM, quite cloudy, no yeast flavors. Carbonation and fruit will go very well. Hoping the funky feet aroma moves on or is over powered by fruit additions. No hop flavor or aroma.


V1:

- Mash normally
- Drain to Kettle
- Raise temp to 176 for 15 minutes
- Chill to 120F
- pitch a pure culture of lacto and let ferment for approx. 2 days, no more than 3, retain 120F.
- transfer the sour wort to the boil kettle
- do my boil as per usual
- chill to 70F
- pitch my yeast culture.
- After ferm complete, pitch peach puree

48 hour @ 120F after pitching lacto. Measured pH of 4.0.

Boiled for 30+ minutes, to hit target volume (6.5 post-boil/pre-chill). Got 6G in carboy.
Low on ice, so only chilled to about 80F, put in fridge to chill and pitched two packets of 1056 around 10PM.

Racked into 13G plastic fermentor and pitched 10# of peach pureee. After 2 weeks, a new lacto pelical formed. Racking the puree was difficult, lost about 1 gallon of volume. Next time need to use some sort of bag or figure out a better separator for the fruit.

PHA: Tighten your connections

Tighten me!

5 Gallon Corny Keg with 5′ 3/16″ ID Beverage line, using MFL connection to a Liquid Quick Disconnect.

Public Homebrew Announcement

When cleaning or replacing your beverage lines always make sure that you tighten the connection or this could be you:

my poor IPA....

All 5 gallons of ff3k IPA on the kegerator floor, leaked out a loose MFL in the span of 24 hours.

That is all…

Working with Dupont Yeast, 3724

Rekkae V3 Saison using 3724 yeast S.G measurement: 1.001

When brewing the previous incarnation of my house saison, I had used the more trusty and beastly Wyeast 3711 French Saison strain which will, in the words of the internet, “it could ferment out an old gym sock”. True to the claims a fast and furious fermentation ended in 7 days leaving me with nothing but 1.000 S.G tasty saison. While it tasted very good and went over quite well I was still looking for something with a bit more spice. To me this meant using Wyeast 3724, the Dupont yeast strain.

The Dupont yeast strain provides a classic saison beer flavor, taste and aroma, including that special spiciness that I so desired. It almost seems like a no-brainer to use 3724, so why wouldn’t I just use that. 3724 can deliver all of these great characteristics but the actual use of this yeast during fermentation can be nerve-racking. A simple search of homebrew forums will yield many pages of “stuck fermentation” and hitting the 3724 “bump” at 1.030 S.G. I was well aware of these posts. I’ve read Farmhouse Ales from cover to cover twice, paying particular attention to the Dupont section that specifically discusses how best to handle fermenting with the strain. I felt well equipped to finally tackle this yeast.

I started fermentation on the cool side, around 70F… Slowly ramped the temp up into the high 70s, around 78F. I held this temp for about 2 weeks. Vigorous fermentation and the yeast eventually dropped out. I wasn’t worried; the schedule in Farmhouse Ales showed that most times, 3724 was fully attenuated in just 2 weeks. I pulled the first sample and before I even put in the hydrometer, I knew it wasn’t done. The beer poured thick and was very opaque, smelling way too sweet to be a dry, 1.004 S.G beer yet. I was crushed when I read 1.045 on the hydrometer, down from 1.066.

Beaten, but not broken, I pulled my first trick out of my sleeve. My fermwrap, temp controller was applied and I cranked the temp up into the mid 80s, around 85F. Two weeks past and progress was made; though only down to 1.030 S.G. I didn’t hesitate, and pushed the temp up to 90F, the upper limits of this yeast. At 5 weeks, I had dropped to 1.029 S.G. I was sure the temp would get things going again, but it hadn’t moved at all.

During this time, I had been swirling the carboy to help suspend the yeast, but that’s just not that effective. So I put together a simple device to rouse the yeast more effectively. I actually had thought of this when doing dry-hopping. Listening to one of the Brewing Network shows on cloning Avery’s Maharajah, Adam Avery was stressing the importance of hop contact time with the wort and he disclosed that at Avery they inject CO2 into the bottom of the fermenter to push up any dropped hops to ensure a good mix and contact between the hop and the beer. My guess was that this would also be a good technique for re-suspending yeast.

I used my 1/4″ air line from my CO2 tank and loosely fitted it over a plastic racking cane that had been sanitized. After starting the CO2 flow, I then lower the rod into the carboy. Pushing the rod to the bottom, I scrapped and turned until the entire wort was cloudy once again with yeast. At week 6, the S.G dropped to 1.018. Success! Another week and rousing to reach 1.009.

Finally, at 8 weeks, we’ve hit terminal gravity. 1.001 S.G at 90F adjusts to 1.004. Not bad. And it was completely worth the wait. The amount of complexity in the flavor this time is just amazing. The dry finish has just the amount of spice I like and the honey aroma is still present. I’m very much looking forward to this 3rd version.

For v4, I plan to keep the same fermentation schedule, but this time, I’ll start re-suspending the yeast as soon as I notice it drop out.

Sour Mashing Equipment

sour_mash_equipment-1024x768

My first brew kettle wrapped in a heatbelt.

I’ve brewed two recipes now that have used a sour mashing technique. The first was a Berliner Weiss from a recipe provided by Black Star Coop. I ran into their Waterloo at the Austin Homebrew Supply store anniversary party a few years back and was hooked on the easy-drinking, sour beer. The second was a Belgian Double Wit, Licensed Fool

The general technique for souring a mash is well known: keep your mash temp warm for 12 to 24 hours after you’ve completed the normal mash schedule for the beer. This extended time and heat allow the biological bugs that reside on the surface of the grain to consume the sugars and multiply which in turn generate various souring compounds, like lactic acid from Lactobacillus.

I’ve heard many stories about how “sick” homebrewer’s beer became during this time as well as the terrible smell. I can attest to this roadkill aroma as I’ve bagged up still-hot grains from a mash and left it in the trashcan. The stench overwhelmed the garage and a new cleanup technique was born. I now remove the liquid and let the grains cool before tossing them in the can.

As I studied number threads on sour mashing on homebrewtalk.com and other articles I wondered if there was a cleaner way to get the sour flavors without risking the whole beer, or even a sour starter which can still be hit or miss. It turns out that, of course, there is a safer way.

Instead of letting the bugs on the grains infect either a starter or your mash we infect the wort with a specific bug, Lactobacillus, but we need to ensure that this is the dominate bug and nothing else can spoil the wort. A simple post-mash pasteurization is performed by heating the drained wort up to 176F and then chilling back down to 120F before pitching a vial of Lactobacillus from White Labs.

There are a few more details needed to ensure good lactic production. First, Lactobacillus are anaerobic, so removing as much oxygen from the environment promotes their grown and keeps other bad bugs (say Acetobacter) from taking hold. The best method I’ve seen for this is to flush the surface of the wort in your pot with CO2, and then covering with foil, plastic wrap, or a sealed kettle lid.

pellicle-on-licensed-fool-1024x768

Sour mashed wort after 3 days

The other critical step is keeping the temperature at 120F without going too high or low. Many homebrewers use ice chest or water chests as mash tuns which have lots of insulation. These vessels tend to hold their heat well over time, but not so well over the multiple days needed for lactic production. This can be addressed with hot water infusions but this dilutes your wort.

Instead I chose to use my heatbelt setup typically reserved for fermentation temp control. My first sour mash occurred during the winter months so I wasn’t sure if two heat belts and some blankets would be enough in the cold garage, however that was fully sufficient. I’ve since upgraded the heatbelts (longer) and added an infrared layer so I can keep heat on my 20 Gallon Blichmann pots which will be needed when I do a 10 Gallon batch of Berliner Weiss.

If the sour mash goes well, then you’ll be presented with a nice, tart-smelling and funky wort. A top layer may form on the surface of the beer. The pelicle forms to protect the bacteria. You can remove it or ignore it. I ended up racking around it.

racking-licensed-fool-to-boil-kettle-1024x768

I also like to check the pH of the wort. As the souring level increases the pH will drop. My first Berliner Weiss I let sour for 3 days and ended up at around 4.0. My second sour brew went for the same time and got close, around 4.2.

checking-ph-1024x768

Equipment List
42 Quart Aluminum Pot with Lid
6′ Heat tape Belt
11″x17″ Infrared Head Pad
Johnson A419 Digital Temp Controller
pH Meter
Auto-siphon for use only with Sour Beers

Racking my first barrel (or two)

woxford_5g_fancy_lad_full-90-1024x768

Woxford Brewing Co. New 5 gallon Oak Barrel filled with Fancy Lad English Mild

Friday night was brewnight for a Belgian Blonde, Sophie Amalie, which was a successful brew, hitting all of the numbers.  The beer had a great taste and aroma thanks to a last minute addition of some spices, lemon verbona, lemon peel and lemongrass.

That night we also racked the Jester King Black Metal Stout (BMS) into my 10 Gallon Whiskey barrel that I had prepared.  I also needed to rack the 5 gallons of Fancy Lad that wasn’t being soured and had initially planned for a stainless keg.  One of my assistant brewers suggested that we use the 5 gallon oak barrel since it needed to be used to pull the strong oak flavor out so we could eventually use it for souring beers.

I was easily convinced though slightly concerned about the barrels’ small leaks.  I ended up soaking the new 5 gallon barrel for 5 days and only on the last day did it seem to hold water.  Hoping for the best, we went ahead and racked Fancy Lad and BMS into their respective barrels.

Once filled, the next challenge was moving the barrels into the room with the rack for aging.  The empty barrels are fairly light; the 5 gallon barrel weighs close to 10 pounds and the 10 gallon barrel closer to 25 pounds.  But after adding beer, roughly 8 pounds per gallon, we were lugging 50 and 100+ pound barrels.

barrel_room_with_both_barrels-1024x768

5 gallons of Fancy Lad, leaking a bit around the head. Black Metal Stout on the right, holding perfectly in the 10 Gallon Whiskey Barell

I ended up using a non-fancy metal turkey roasting pan under the 5 gallon barrel to contain the slow leaking mess.  This proved less useful than intended.  The weight of the barrel stand poked through the tray in a few places so a backup of using old cloth diapers was employed to soak up the beer.  I even used a large fan to dry the barrel in an attempt to slow the leak.   This helped quite a bit and it’s not leaking much at all.

Days later something new appeared; the slow leak is soaking the outer wood of the barrel and keeping it moist with sugary beer, and the temp is a balmy 75F.  This leads to mold forming on the outside of the barrel.  Daily cleaning and scraping should prevent any migration of the bugs into the barrel, but only time will tell if that’s true.

Since the 5 gallon barrel is new and beer (Fancy Lad) is light, I plan to leave it in the oak prison only for two weeks.  I’ll put up a post on sampling the two barrels next week.