
10 Gallon Electric BrewEasy (TM) Setup. Photo by Mark
My longtime assistant brewer has slowly transitioned into a full-time brewer on his own. Mark initially started with a Brew-in-a-Bag (BIAB) setup to brew Kombucha. Over time, the recipes changed to BeerBucha, all-grain beer recipe but Kombucha SCOBY for fermentation. Finally he just switched to beer and exclusively employs a mixed-culture blend from Jester King. After the completion of the Battle Shed Mark’s Rebel Brewing Alliance decided to get ahead of opposition and transition into an electric brewing setup, Blichmann BrewEasy.
Last week he invited me over during his initial brewing run to take a look at his new setup and become *his* assistant brewer. The first beer is Jester King’s Das Überkind Vieille Saison. The BrewEasy 10G equipment profile is available in BeerSmith2, merely selecting the Blichman 10 Gallon profile, which uses a 20 Gallon BoilKettle and a 15 Gallon Mash Tun. The BrewEasy is slightly different since it’s doing a recirculating mash process combined with BIAB-style where all of the water needed is provided up-front and split between the two pots. The BrewEasy recirculation loop consists of liquor from the mashtun using gravity to drain through the false bottom into the lower boil kettle using a custom steel tube that connects to the output valve on the 15 gallon mash pot. Inside the boil kettle resides the electric element which requires approximately 6 gallons of liquid to ensure the element is always covered. The output of the boil kettle is connected via hose to a pump with a stainless T adapter in which resides a temperature probe connected back to the Tower of Power for reading the current temperature of the liquor/wort. The output from the pump flows up to the side of the mashtun and into a Blichman Autosparge which uses a ballast (floating arm) to control the input flow back into the mashtun. The brewer controls the level of the floatarm and the opening of the mashtun to balance the flow of wort between the mashtun and boilkettle.
At the start, we split the water between the two kettles and started the element to heat the water to a target of about 161F for dough-in at about 152F mash temp. We set the float arm to keep 10.5 gallons of water in the mashtun and the remaining 8 gallons in the boil kettle. We noticed during this process that there was a delta in temperature reading between what was being measured at the T off of the pump and the actual water in the mashtun. We measured about about 4F degree loss between the pump and the water in the mashtun. My initial thought was that the temperature probe really ought to be right next to the input to the mashtun, right before the sparge arm. With the delta in mind, we raised the temp to reach our target and started the dough-in. The strike temperature was calculated by using the upper mash volume (10.5 gallons), the amount of grain and the grain temperature.
After doughing in, we noticed two things. First we had overshot our strike temperature, and second that the sparge arm was not open due to the additional volume now in the mashtun. After fixing the arm level, recirculation resumed and now our temperature rose again. This revealed the second “flaw” in the system. The temperature sensor that controls the element in the boilkettle/grant measures temperature as it passes in the loop. When the sparge arm closes the value, we’re no longer recirculating and the temperature in the loop falls meaning the element in the kettle is active to raise the temperature. Without recirculating, the controller never knows the temperature inside the kettle and we ended up raising the remaining water in the kettle far above our strike temperature. Additionally since we recirculated 18 gallons instead of 10.5 gallons, the additional thermal mass meant that we didn’t need to raise the strike temperature up to 161F, rather we should have only reached about 157F to ensure a target of 152.
Mark worked around this overshoot by leaving the mash isolated and reciculating the remaining liquid in the lower pot itself until it returned to the target temp of 152F. Several times during the mash itself, the same problem repeated itself, as we attempted to raise the volume of liquid in the mashtun to match the water/grain ratio, this ended up closing the recirculation valve and leaving the element on raising the temperature in the boil kettle higher than needed to retain a target mash temp.
Upon reflection, and examining how The Electric Brewery has designed their HERMS loop, a few things come to mind for the BrewEasy. First, the autosparge is not needed at all. In the case where all of the water needed for the batch is available at the start, the closing of the loop via autosparge is only going to cause problems, as we described above. Removing the autosparge would have fixed the major issue above that prevented the temperature sensor from controlling the element temperature. The second issue was the location of the temperature sensor. To keep the mash temperature held, we really want to measure at the output of the mashtun; after the water has gone through the grain bed. This is just not possible on the BrewEasy setup due to the design of the return pipe which directs the flow via gravity directly into the boil kettle below.
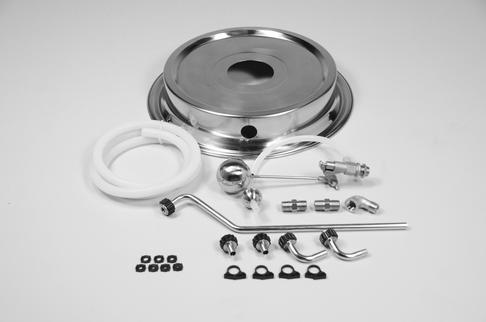
BrewEasy 10 Gallon Adapter Kit. Photo by Blichmann Engineering.
In the picture, you can see the bent tube, which is the Drain Pipe with Orifice, designed for the G2 Kettles. Contrast that with the kit for the G1:
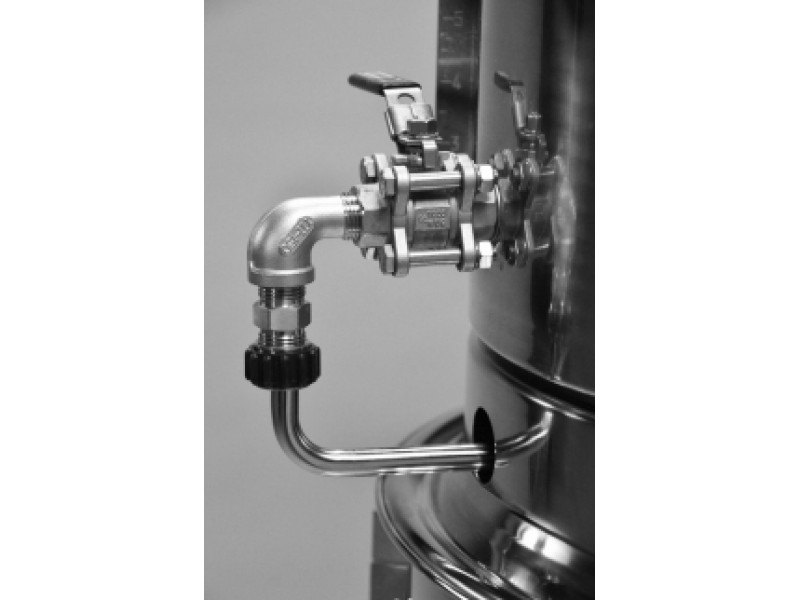
BrewEasy 20 Gallon Adapter Kit. Photo by Blichmann Engineering.
Even with the G1 kettle which uses a 90-degree street-elbow, it’s not clear to me that one would be able to introduce a stainless T and move the temperature sensor there.
With the mash complete we moved on the to boil which went off flawlessly if eerily almost silent due to the electric coil heat source.
A few other items worth mentioning. On the Tower of Power (ToP) itself the display could use some UI/UX improvements. The current and target temperatures are easily seen but it’s not immediately clear whether the heating element is on. There is a small green dot indicating whether it is on or not but it should be quite a bit more obvious. Given the Tower of Power history, originally designed to control a Blichmann gas burner, it’s easy to see that a small light on the ToP wasn’t a big deal as the noise from a running burner would make things much more obvious. The silent nature of the electric element though exposes this design issue.
I’m a huge fan of the plastic hose clamps. They are easily manipulated by fingers, rather than tools. Since they’re not metal, one doesn’t have to worry about tearing or ripping the hose material. Excellent attention to detail here.
The G2 kettle sight tube includes a metric scale (yay!) however, instead of having a second part, the sight tube now includes metric on one side and US on the other oriented upside-down so as to not confuse the brewer when in use. I would have preferred the tube to include the unit abbreviation (L, G) next to the numbers so I could measure either in in Gallons or Liters without detaching the sigh tube to switch.
As mentioned above, if one does make use of the Autosparge, the 3-way flow meter from Blichmann should be a requirement, otherwise with the lid closed on the mashtun there is *no* way of knowing whether you’re actually recirculating wort or not. It would be an improvement for the Tower of Power to require a *flow* meter in addition to the low-water detection switch and stop applying heat if either are tripped (no flow or low water should prevent firing of the element instead of just the sounding a horn as it does now).
In all, the BrewEasy is a really nice setup but I do believe that the current version certainly has some issues that make it more difficult to use than the current state-of-the-art setup from The Electric Brewery.
I’m looking forward to more brewdays with Mark as an assistant brewer; always something to learn from anyone’s brewday.
Recipe Details
| Batch Size | Boil Time | IBU | SRM | Est. OG | Est. FG | ABV |
|---|---|---|---|---|---|---|
| 12 gal | 90 min | 13.1 IBUs | 5.6 SRM | 1.045 | 1.011 | 4.4 % |
| Actuals | 1.046 | 1.01 | 4.7 % | |||
Style Details
| Name | Cat. | OG Range | FG Range | IBU | SRM | Carb | ABV |
|---|---|---|---|---|---|---|---|
| Saison | 17 2 | 1.048 - 1.065 | 1.002 - 1.012 | 20 - 35 | 5 - 14 | 2.2 - 2.8 | 5 - 7 % |
Fermentables
| Name | Amount | % |
|---|---|---|
| Pilsen (BestMälz) | 18.15 lbs | 84.03 |
| Wheat, Torrified | 1.729 lbs | 8 |
| Oats, Flaked | 13.83 oz | 4 |
| Caramunich Malt | 13.7 oz | 3.97 |
Hops
| Name | Amount | Time | Use | Form | Alpha % |
|---|---|---|---|---|---|
| Goldings, East Kent | 1.18 oz | 60 min | Boil | Pellet | 5.6 |
Mash
| Step | Temperature | Time |
|---|---|---|
| Mash In | 152°F | 60 min |
| Mash Out | 168°F | 10 min |
Download
| Download this recipe's BeerXML file |